
Free Christian Guitar Lessons Lesson 8
Go Back Home
Power/Barre Chords-
In this Lesson you'll be learning about Power/Barre Guitar Chords! Depending on the sound of your Guitar will determine whether the Chord is referred to as either a Power Chord or a Barre Chord. Either way the Guitar Chord will look the same.
The reason I taught you to play the E Major without using the Index Finger is- The Index Finger is going to Barre across all the strings while playing Barre Chords. Barre Chords are movable - Instead of changing Finger Position, you will change location of the Guitar Chord.
When going for a lighter sound - Focus your Strum on the Bottom 4 Strings
When going for a heavier sound - Focus your Strum on the Top 4 Strings.
When doing Rock Music (playing Power Chords), the bottom 2 Strings are Rarely Touched. That being said, you don't have to worry about Barring all the way down to strings 1 & 2.
-This will Make it Easier For You!
Let's get Tuned Up
---Youtube Video - Getting your Guitar all Tuned Up- Click Here---
Barre Chords/Power Chords Explained
---Youtube Video - Barre / Power Chords Explained - Click Here---
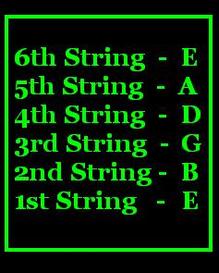
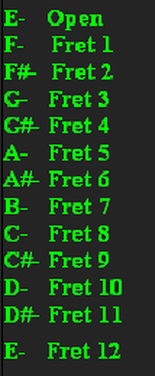
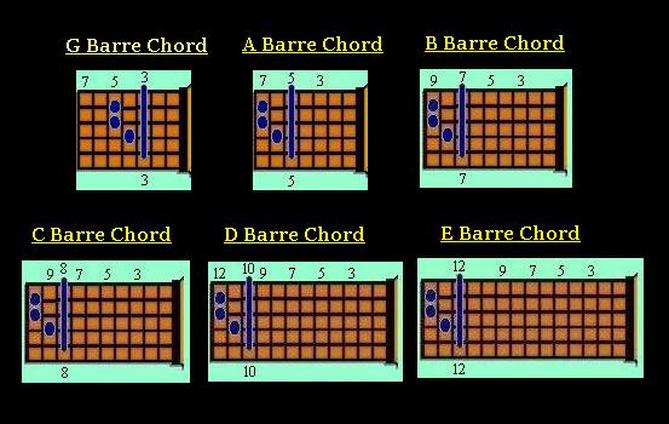
You'll need to learn the Notes on the 6th String (Low E).
Paying attention to the Inlays (usually white dots) on the Guitar Neck are really beneficial.
These Inlays are found at the following Frets- 3rd, 5th, 7th, 9th, 12th, 15th, 17th, 19th, 21st, and 23rd.
Finger Positioning of a Barre Chord-
Let's start with playing a E Major Guitar Chord. This will be the general form of your fingers while playing Barre Chords.
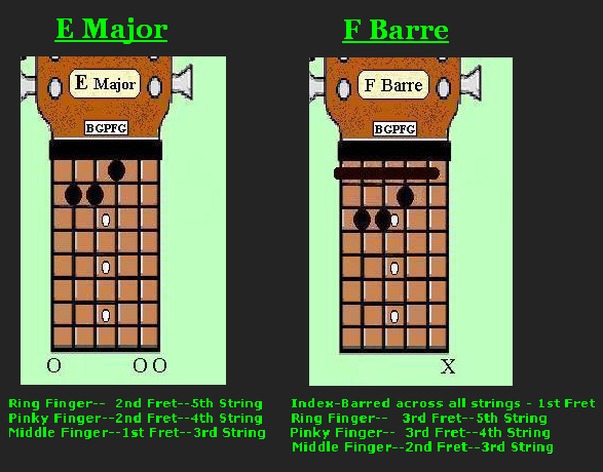
Start with E Major, then slide this entire finger positioning up 1 Fret and use the Index Finger to bar across all the Strings on the 1st Fret. This will be your 1st Barre Chord, it's a F Major.
F# Major Barre
F# Major Barre
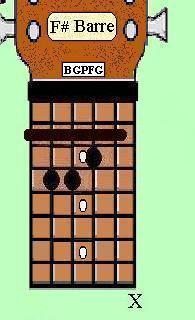
Next Step - Slide positioning up 1 Fret and the F Barre Chord and turned it into F# Barre Chord.
The (#) is the sign for Sharp, most Guitar Chords going between A througuh G will have a Sharp (example - G - G# - A).
The B & E are the only Chords that do not have Sharp Chords (examaple - D - D# - E - F).
There's not really a lot to it-
Slide the entire finger positioning up 1 Fret and you have your next Barre Chord. The Simplicity is the Best Part!
Lesson 8 - Practice Rhythm
How to Play this Practice Rhythm -

I will be doing 2 Versions of this Practice Rhythm
1st will be a slower version. This will help you to get yourself familiar with using Power Chords. This might take a little while, so be patient - It'll be Worth It!
2nd will be at Regular Speed. I highly advise working with the slower one until you feel comfortable. Then, move onto this version. This is not that hard of a Practice Rhythm, once you get familiar with Power Chords.
In this Practice Rhythm, I used all Power Chords that had a In-Lay Fret Marker (Dots on most Guitars).
I did it this way to allow you to have an Easy way to know where to go when making quick transitions.
Getting a Distortion Rock Sound
I used a Multi-Effects Guitar Pedal, to get the Rock Sound for the Practice Rhythm. There's different types Guitar Effects Pedals. Also, many Guitar Amps have a Distortion Channel (and, a Clean Channel). You'll want to use the type of Distortion (or Over Drive), that sounds Best to you. Acoustic Guitars will not have this option.
You'd plug the Effects Pedal between the Guitar & Amp. So - You'd go Guitar, Effects Pedal & then Amp.
Practice Rhythm - Letter/Number
In the Practice Rhythm below, you'll see Letter/Number for each of the Chords. This has been done to Help you to Quickly know which Fret to have your Index Finger on. The 'G Major' is at the 3rd Fret. To make things Easier, I have that listed as 'G3'. That will let you know at the 3rd Fret, is the G Major.
Now that you have the Info - Let's Get Started!
--Youtube Video - Lesson 8 Practice Rhythm - Slower Tempo - Click Here--
--Youtube Video - Lesson 8 Practice Rhythm - Rock Tempo - Click Here--
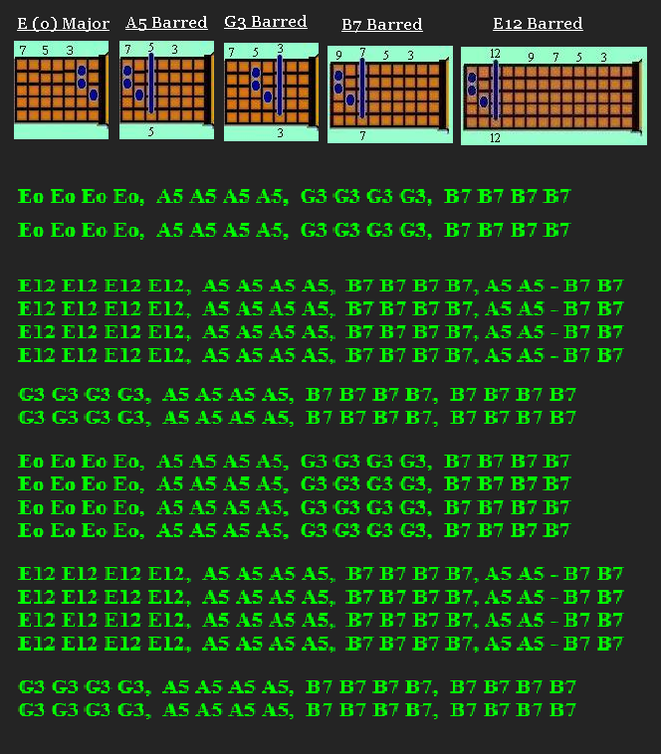
Eo - E Major (next to the Head Stock), E12 - E Barred at 12th Fret (same Chord - different sound).
We will be learning about the Barre Chords using the 2nd String in the Lesson9. Take your time and learn this correctly.
You are on you way to becoming a Rock Star for Christ!
Go Back Home
