
Free Christian Guitar Lessons Lesson 5
Anatomy of the Guitar-
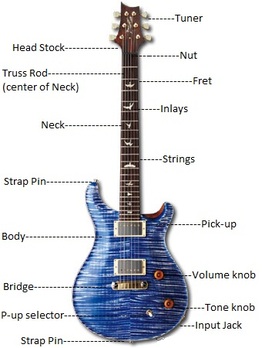
The Guitar is composed with a Body, Neck & Head Stock prior to getting any hardware. The flat part of the Guitar Neck is called the Fret Board, (the other side of the Neck is rounded).
Spaces between the metal bars are called Frets. The area between the Guitar Nut and the first metal bar it called the 1st Fret; from there - 2nd Fret, 3rd Fret and so on.
Truss Rod is found inside the Guitar Neck, it is used to allow the Neck to stay straight.
Bridge allows the vibrations from the Guitar Strings to reach the top of the Guitar & is non-moving - Acoustic Guitars.
---Electric Guitar - Bridge adjustable- controls the height of strings.
Nut - The Guitar Nut keeps the Guitar Strings off of the Fret board- found on Head Stock
Tuners - Located on the Head Stock - tunable piece of hardware. The Guitar String wraps around in order create tension. Tension allows sound to be produced by a Guitar String.
Pick-ups - high powered microphones that pick up the vibration and sound produced by the Guitar Strings. There are Active (Battery Powered) and Passive Pick-ups.
Volume Knobs - allow you to control how loud the Guitar will sound.
Tone Knobs - allow you to change the tone on the corresponding Pick-up.
Input Jack is where the Guitar Cable is placed to plug into a Guitar Amplifier or a PA.
Pick-up Selector - toggle switch that allows you to select which Pick-up that you want to use.
Adding in your next Guitar Chord-
The 'E' Major -
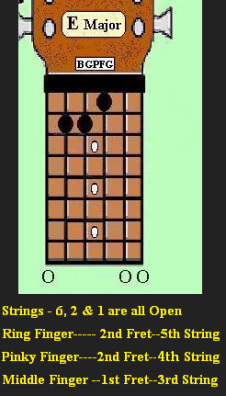
This is one of the Best sounding Guitar Chords that I've learned.
--The Guitar Chord Diagram - All Strings are played.
Focus most of the pressure on the top 4 strings,
--Minimal Pressure on the bottom 2 strings.
This will allow you to have a more Powerful Sound.
There are a couple ways to this Chord- In order help to make Power Chords at a later time I'm going to focus on using the Middle Finger, Ring Finger & Pinky for this Chord .
Tips on Playing Music with others
Now that your learning to play the Guitar, it is good to know How to Play with other Musicians. Learning about this took me a few years to get right. Music always sounds Best when you Blend sound, with the others.
Match your Volume Level and Keep your timing identical to the other Musicians. Doing this, you will find a more of an enjoyable sound. Each Guitar has its own unique sound. This is due to the type of wood, cut, finish and the process used in making the Guitar. This will affect the overall sound. Therefore, if your Guitar volume is exactly the same as another Guitar -there will still be additional sounds produced, even while playing at the same volume level.
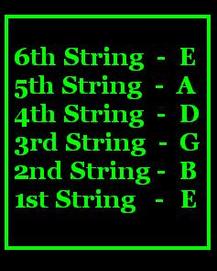
Let's get all Tuned Up!
It works Best to have your Guitar in hand, while listening to the Tuning Up, Guitar Chord and Practice Rhythm Audio Files. That way - your able to play along and get the most out of these Lessons.
---Youtube Video - Getting your Guitar all Tuned Up- Click Here---
Lesson 5 - Practice Rhythm-
Here is an example Guitar Rhythm that I have created a few years ago. If you pay attention to how these Guitar Rhythms have been since the 1st Lesson, you will notice that they have been getting harder to play with each lesson.
--If you have a hard time playing this, take it slow & gradually build until you are able to play the entire Rhythm.
--Youtube Video - Lesson 5 Practice Rhythm with Vocal Instruction --
--Youtube Video - Lesson 5 Practice Rhythm - no Vocal Instruction --
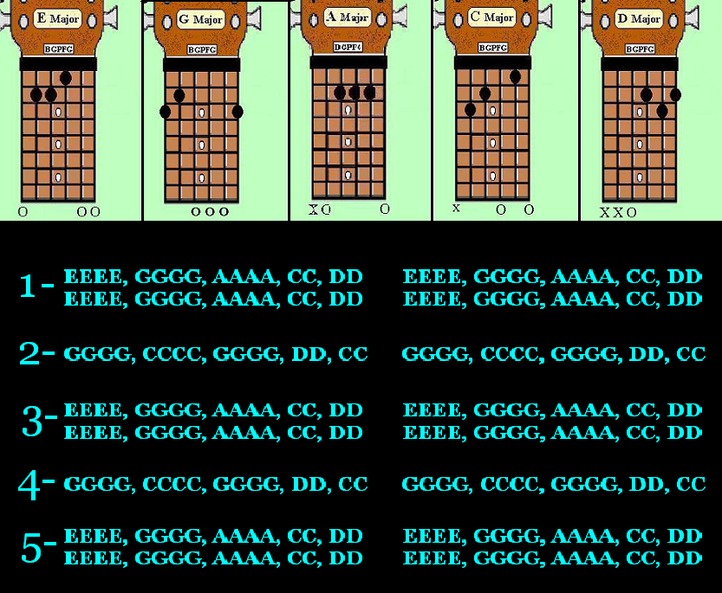
In the Rhythm above -
The last 2 Chords (of each line) are going to be a faster transition. You'll want to keep the same timing as the rest of the song.
With practice- You'll be sounding like a Pro in no time!
Go Back Home
