
Free Christian Guitar Lessons Lesson 3
Go Back Home
Get a Good Sound-
Important - pay attention to a Guitar Chord Diagram. This will allow you to know which Strings to play & which one's not to touch. These Guitar Chords sound best when playing exactly as shown.
Use both Down & Up strums. The strumming pattern can be different, depending on the song and style of Music you are playing. It's important to pay attention to the music and play around with the Strumming Pattern to find what sounds Best!
Not Jumping in too fast-
Take your time and focus on Precision. It's very important to take your time and learn to play correctly, that way you will sound good while playing with other Musicians! Listen to the individual strings from time to time. Each string should ring out, while playing Guitar Chords.
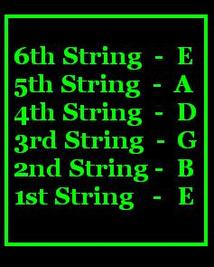
Let's get your Guitar all Tuned Up!
It works Best to have your Guitar in hand, while listening to the Tuning Up, Guitar Chord and Practice Rhythm Audio Files. That way - your able to play along and get the most out of these Lessons.
Let's get Tuned Up
---Youtube Video - Getting your Guitar all Tuned Up- Click Here---
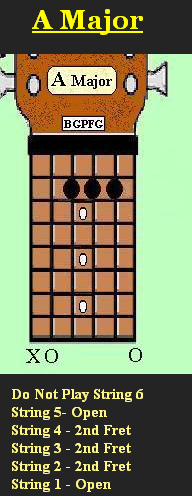
Adding the next Guitar Chord-
The 'A' Major Guitar Chord is played using the strings 2, 3 & 4 in the 2nd Fret. This can be played a few different ways depending on the size of your fingers. Ways of the 'A' Major are listed below.
--Youtube Video - A Major Guitar Chord Explained - Click Here--
Ways of Playing the 'A' Chord
(1) Most people usually use the Index, Middle and Ring Fingers to play this chord. You will want to make sure that you are able to fit all 3 fingers in-between the metal bars.
(2) Use the Middle, Ring and Pinkie fingers push down the exact same Guitar Strings in the same spot. This is good for people that have bigger fingers.
(3) Using your Index finger to bar the 3 Guitar Strings. Don't touch the bottom string. The 1st knuckle on your Index finger will bend opposite of the normal bend. The part that actually touches the Guitar Strings is the 1st segment. It takes a lot of practice to be able to do this.
---But, with practice you can have Lightning Fast Chord changes.
Lesson 3 - Practice Rhythm-
While you are playing this Example Rhythm, focus more on timing and transitioning between the Guitar Chords. You can play this at your own pace and build speed with time. The main thing - All Chords should have evenly spaced timing.
--Youtube Video - Lesson 3 Practice Rhythm with Vocal Instruction --
--Youtube Video - Lesson 3 Practice Rhythm - no Vocal Instruction --

After you have gotten Good at playing the Rhythm Exercise that I had 'Created', try coming up with your own Rhythm Exercise.
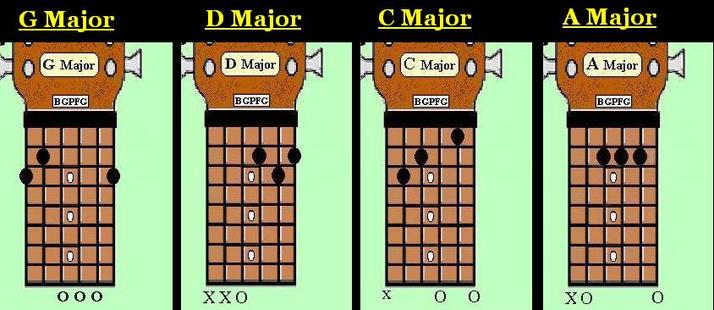
There are 100's (if not 1,000's) of songs that only use these 4 Guitar Chords. Try to practice a little every day. The more time that you can spend Practicing on this - the Better!
As mentioned above - Take your time and learn how to play each Guitar Chord correctly. As you are learning new Guitar Chords, your fingers will be bending in some weird ways. Try to listen to the strings individually. Listen for Buzzing that is associated with not pressing firm enough on the Guitar String or a finger barely touching an un-wanted String.
Go Back Home
