
Free Christian Guitar Lessons Lesson12
Go Back Home
Reverse Transposing
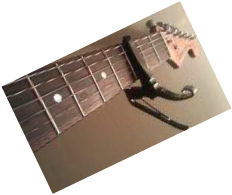
In Order to explain 'Reverse Transposing', you will 1st need to understand 'Transposing' and how it is used. Through out my years of Playing Guitar in Churches, the 1 thing that I have seen more than anything is a 'Capo' (Pronounced as KAY-poe).
A 'Capo' is a removable device that is used on the Guitar Neck to change the Pitch/Key of the Guitar. This is more so a Trick that Guitar Players can use to make Harder Guitar Chords easier to play.
Reverse Transposing
In Order to explain 'Reverse Transposing', you will 1st need to understand 'Transposing' and how it is used. Through out my years of Playing Guitar in Churches, the 1 thing that I have seen more than anything is a 'Capo' (Pronounced as KAY-poe).
A 'Capo' is a removable device that is used on the Guitar Neck to change the Pitch/Key of the Guitar. This is more so a Trick that Guitar Players can use to make Harder Guitar Chords easier to play.
The 'Capo' will stop the free moving Guitar Strings at what ever Fret that you place the 'Capo' on. Look at your Guitar - The 'Nut' (just before the Head of the Guitar) stops the Strings.
The Capo does the same thing. So, you could look at it as a 'Movable Guitar Nut'.
Here's An Example - Once you place a 'Capo' on the 4th Fret of the Guitar Neck, Frets 1-3 will not be picked up by the Sound Hole (Acoustic Guitar) or the Pick Ups (Electric Guitar).
-- I don't want to over explain this. If you need a 'very detailed' explanation - do a Internet Search on 'Capo For Guitars'.
Transposing
'Transposing' is a Term used, when using a 'Capo' to change the Key of a Song. Usually (but not always) a 'Capo' to change the Key of a Song to match the Singer's Voice. If the Main Singer doesn't have the ability to go as Low or High of a Pitch as the Original Singer of the song - A 'Capo' is usually used to allow the Song to be played in a different pitch. Once you place the Capo on the Guitar, you will still Play all the Original Guitar Chords. Since the 'Capo' is in place - The Song will be Played exactly the same.
--Meaning the Timing and Spacing of your Strums will still need to be as close to the Original as possible.
The only difference is - The Song will be in a different Pitch, allowing the Singer(s) the ability to still sound Good. Even if the Original Pitch is way 'Too High' or 'Too Low' for the Singer.
Here is a Visual Example
This is a Diagram that I Built, which can be used to Quickly find what Guitar Chord to Play when using a 'Capo. You will want to start on the Side when 'Transposing'. You will look for the Original Guitar Chord and then follow that to match with the Number on the Top.
---- The Numbers on the Top, represent the Fret that the 'Capo' is on.
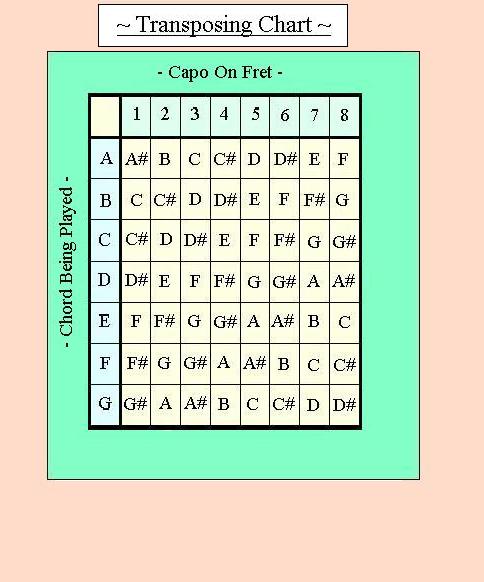
In this 'Transposing Chart', I just went to the 8th Fret. I did this becasue, it's rare to use a 'Capo' past the 8th Fret - We want to just Focus on Useful Information!
Here's An Example Of How to Use This
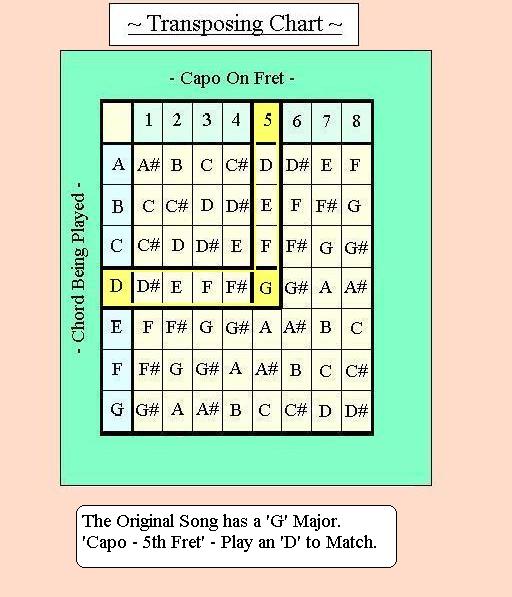
Example 1
The Original Guitar Chord was a 'G' Major. By placing the 'Capo' on the 5th Fret of the Guitar, the Pitch is changed. To Play the same Guitar Chord in sound, you would now Play a 'D' Major. The 'Capo - 5th Fret 'D' Major' will sound the same as playing a 'G' Major, it will just be a slightly higher Pitch.
Here's An Example Of How to Use This
Example 1
The Original Guitar Chord was a 'G' Major. By placing the 'Capo' on the 5th Fret of the Guitar, the Pitch is changed. To Play the same Guitar Chord in sound, you would now Play a 'D' Major. The 'Capo - 5th Fret 'D' Major' will sound the same as playing a 'G' Major, it will just be a slightly higher Pitch.
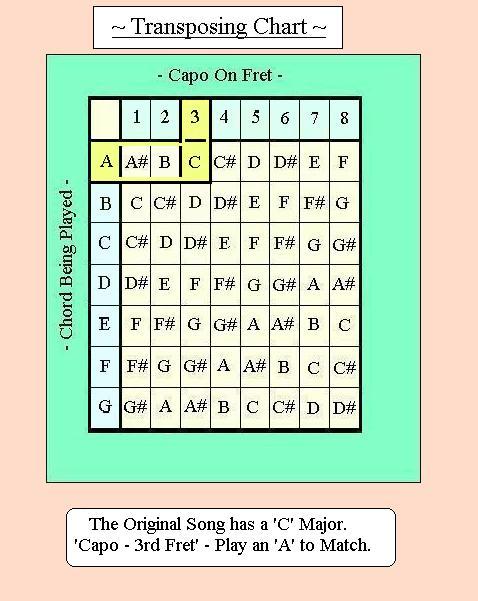
Example 2
In 'Example 2', we use the exact same pattern. But, Change the Chords & what Fret the 'Capo' is on.
Looking at this Diagram, you can see the Original Guitar Chord that was Played, was a 'C' Major.
Once you place the 'Capo' on the 3rd Fret, you will need to Play a 'A' Major now.
Same as Before - The 'Capo - 3rd Fret 'A' Major' will sound the same as playing a 'C' Major, just at a slightly higher Pitch.
Most songs that you will get as a 'Newer Guitar Player' playing in a Praise Team, will already have this part done. They will have the 'Lyric/Chord Sheets' (AKA - Songs to play), already Transposed. Usually on the top of the sheet, it will say 'Capo 4' or whatever 'Capo' position that you will need to be in. This could be in 'Capo 1' all the way up to 'Capo 8'. It's usally rare to go past 'Capo 8'.
This whole explanation, is to explain out 'What it all means'. And, you will need to understand this part in order to understand 'Reverse Transposing'.
Reverse Transposing
Here is some 'Valuable Information' that I had a really hard time finding anything out on. Even in multiple Internet searches, there wasn't much mentioned on 'Reverse Transposing'.
Here is the 'Reason' why I put this as 'Lesson 12'
One of the Praise Teams I was on, as a Rhythm Guitarist. I was '1 of 3' Guitar Players (4, if you add the Bass Guitar Player). Most of the Songs we Played, used a 'Capo', to work better with the Main Singer's Voice. The issue that I came across is that, you aren't able to Play Power Chords when using a 'Capo'.
My 'Mind Set' has always been - If I am going to be involved in a Prasie Team, I want to add to the sound of what is already being Played. I have always been a Fan of using Power Chords/Barre Chords, when I play Music. So, I started a Journey to find out how I could Play Power Chords and still 'Match' the sound of the other Guitar Players using Capos.
The 'Main Reason' that I Built the 'Transposing Chart' (that you saw at the Top of this Lesson), was more so for the intent of doing a 'Reverse Transpose'. Go ahead and look at this Diagram again.

This same 'Transposing Chart' can be used in Reverse. You can use this to find out -
---What Power Chords can I play to 'Match' someone using a 'Capo'? ---
Let me give you an example, of what I mean.
Example 1
---What Power Chords can I play to 'Match' someone using a 'Capo'? ---
Let me give you an example, of what I mean.
Example 1
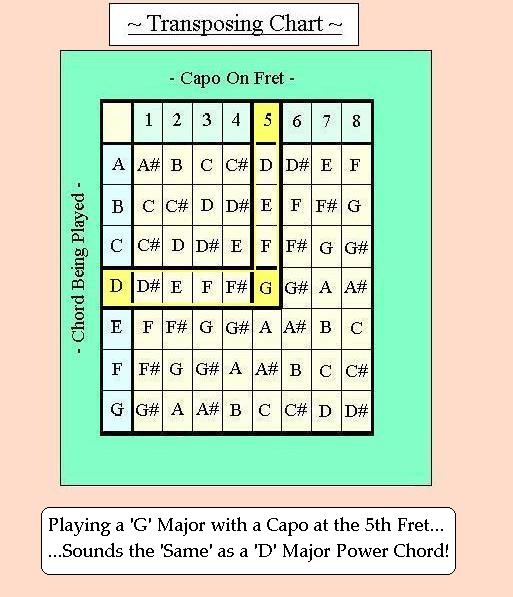
In this Example - When someone is Playing a 'G' Major with a Capo on the 5th Fret, you get the same sound by Playing a 'D' Major/Minor (Either one will work) Power Chord. This is how 'Reverse Transposing' works. If you have done these Lessons in order and have completed all of the Practice Rhythms, you should have a good grasp on Power Chords by now. This piece in the Puzzle -
Will allow you to play Power Chords, while playing Music with others that are using 'Capos'.
Let me give you another example.
Example 2
Will allow you to play Power Chords, while playing Music with others that are using 'Capos'.
Let me give you another example.
Example 2
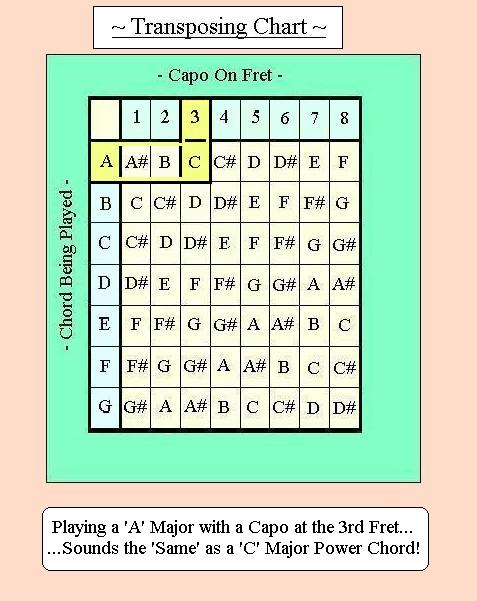
In this Example - This is the 'Same Pattern' as in the previous example. When another Guitar Player is playing a 'A' Major with a Capo at the 3rd Fret, will sound the same by playing a 'C' Major Power Chord.
Keep In Mind - In order to use this in a 'Live' situation, you will need to do some work ahead of time.
Meaning - When you receive your Prasie Team (or other group) Songs, you will want to make copies of the Orginals, White Out the Chords on the Copies, Use the Formula that I explained and Mark the Copy of the Lyric/Chord Sheet with the Power Chords. The reason for having the Copies of the Original, to allow yourself to use the 'Capo' from time to time.
Not all songs are going to sound Best, with Power Chords.
--It will be up to you to decide, what is way to make the song sound it's Best.
This has been a 'Very Long' explanation. My Goal with this Lesson, is to give you additional Freedom. Having the ability to 'Choose' whether to use a 'Capo' or not, is rare. Not many Guitar Players have learned this. Look at that as a Good Thing...
---You have information that many Guitar Players don't know.
Lesson 12 - Practice Rhythm
Here is a Practical way of using the infomation that you have just learned. This Practice Rhythm can be played by using either Guitar Capo or Power Chords. I'd recommend trying it both ways. If you don't own a Guitar Capo - you'll need one in order to play this Practice Rhythm with one. You can buy them at most Music Instrument Stores or On-line through various Websites. They cost about $15.00 for a Decent one. Go with a Decent one, over a really Cheap one. The Decent one's are Easier to use and Faster (Important) to change position. Most times when Playing 'Live' Music, you might only have 30-45 seconds between songs.
You will not have time to work with a Cheap Capo. Cheap Capos take longer to get on & take off.
This is a 'Simple Song' to Play. It starts off with a Single Guitar and gradually other Instruments are added. This starts off with a Guitar using a 'Capo at the 3rd Fret'. There are only 3 Guitar Chords to the whole Song.
This Practice Rhythm has a bit of a 'Psychedelic' feel to it. It's Style was based off of a song by the band 'Yes', called 'Wurm'. I am by no means, the Lead Guitar Player that Steve Howe is. He is the Original Lead Guitar Player for this song. But, this will give the the chance to have 'Fun' with a Simple Song!
Guitar Chords
You can play this Practice Rhythm with either with a Capo or with Power Chords. Either way, you will just play 3 Chords and Repeat the Guitar Rhythm. Pay attention to the Changes in Strumming Patterns.
Capo 3 - 'E' - 'C' - 'A'
-- OR --
Power Chords - 'G' - 'D#' - 'C'
---Youtube Video - Lesson 12 Practice Rhythm *Capo or Power Chords, you choose*---
As mentioned before - There is only 3 Guitar Chords that are Played in this Practice Rhythm. Things start slowly and other instruments are added. As you get further into the Practice Rhythm, the Strumming Pattern has a lot of changes. The Changes in the Strumming Pattern, is what takes this Simple Song and makes it interesting.
Try to stay away from being 'Mono-Tone' in your Strumming.
---This will help to keep you listeners Awake and Wanting more!
Go Back Home
