
Free Christian Guitar Lessons Lesson 10
Go Back Home
Let's get Tuned Up
---Youtube Video - Getting your Guitar all Tuned Up - Click Here---
Sliding Guitar Chords
The information that you will be learning in this Lesson, wasn't learned from an Instructor or in a Book. This was learned through trial & error. When I learned about Power Chords/Barre Chords, Major Power Chords were simply taking the E Chord finger position, barring the Fret with the Index Finger and moving it. With the Minor Power Chords, you did the same thing. But, with using the A Minor Chord finger position. After a little while I decided to try doing this with other Guitar Chords. And what I found, was pretty interesting!
1st of all I want to start by mentioning that I usually use this Technique specifically for a Bridge in a Song or for an intro. This allows you to take Guitar Chords that you already know and add a little extra to a Song that might be very simple.
--For the most part, many Guitar Chords that you have learned so far can be Slid to another Fret and have a different sound.
In this Lesson, I will show you a few of them and then, we'll use this in the 'Lesson 10 - Practice Rhythm'.
Sliding the 'D' Major
---Youtube Video - Sliding the D Major - Click Here---
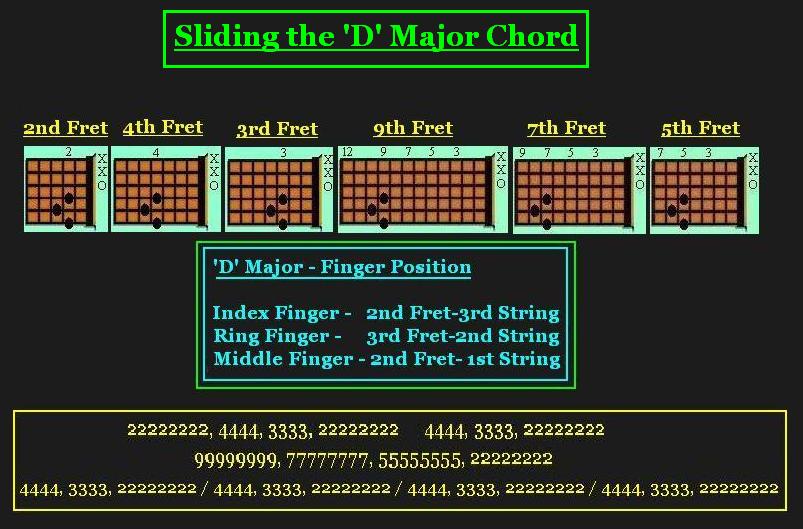
The 'D' Major Guitar Chord was the 1st Chord that I tried this with. It's important to know that it doesn't sound good at all Frets on the Guitar. But, there are a few that sound really good. To make things simple, I will list the Fret that the Index Finger & Middle Finger are on.
Sliding the 'C' Sus
---Youtube Video - Sliding the C Sus - Click Here---
Sliding the 'C' Sus
---Youtube Video - Sliding the C Sus - Click Here---
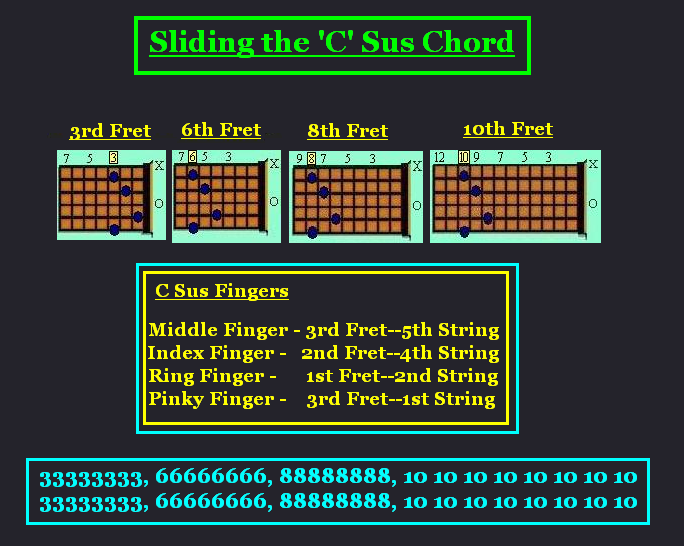
The 'C' Sus is another Guitar Chord that I've used in a Bridge to Song. It sounds pretty Cool and it's easy to do. The numbers listed below resemble the Fret with the Middle Finger and the Pinky Finger of this Guitar Chord.
--All the Fingers stay in the same position - They are just moved down the Neck of the Guitar.
Sliding the 'F' Major
---Youtube Video - Sliding the F Major - Click Here---
--All the Fingers stay in the same position - They are just moved down the Neck of the Guitar.
Sliding the 'F' Major
---Youtube Video - Sliding the F Major - Click Here---
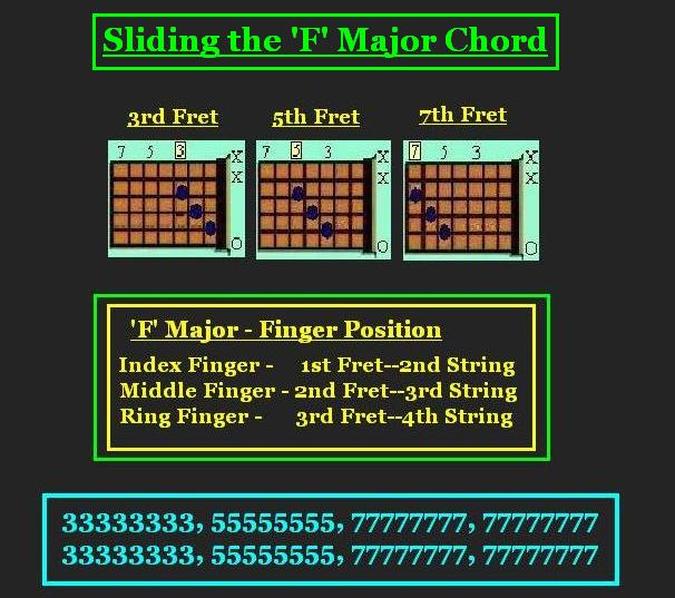
The 'F' Major will slide and sound good, too. The numbers below represent the Fret with the Ring Finger. Simply slide the whole Finger Formation to each of the positions below. This makes for a Cool Bridge in a Song.
---A Bridge is simply a Great way to break up a really simple Song.
Sliding the 'A' Major
---Youtube Video - Sliding the A Major - Click Here---
---A Bridge is simply a Great way to break up a really simple Song.
Sliding the 'A' Major
---Youtube Video - Sliding the A Major - Click Here---
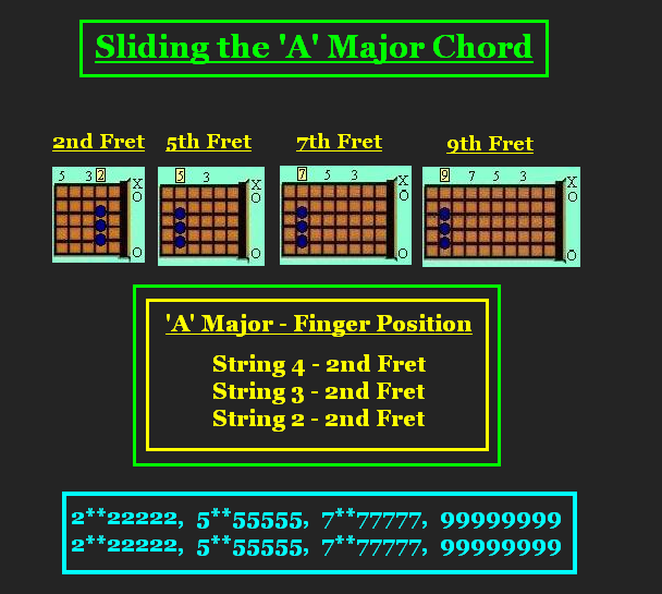
The 'A' Major has similar qualities to the 'E' Major. Meaning - With the 'E' Major, if you slide the Finger Formation 1 Fret you get 'F'. If you slide the 'E' (3) Frets, you get 'G'. If you slide the 'E' (5) Frets, you get 'A' and So On. With the 'A' Major (pictured above) it's the same way. The 'A' Major is done at the 2nd Fret. If you move the same Finger Formation to the 5th Fret, you have 'C'. If you move it to the 7th Fret, you have 'D'. And, if you move the same Finger Formation to the 9th Fret, you have 'E'. This can go on & on - Down the Neck of the Guitar.
---In this quick Guitar Rhythm, each section is equal to an 8 count. So, (2** 22222) actually has 8 spaces or 8 Strums. The (*) means to let the Chord ring out. Since there are 2 of them, in each area it is used, you want to let the 1st Strum ring out for 2 seconds.
Lesson 10 - Practice Rhythm
In this Practice Rhythm, we are going to work on just 3 Guitar Chords (A, C & D). But, they will be played in each of the ways that you have learned in these Lessons.
We will include 'Sliding the A Major' that you just learned. This will get you more familar with changing between the Regular, Power & Sliding Guitar Chords.
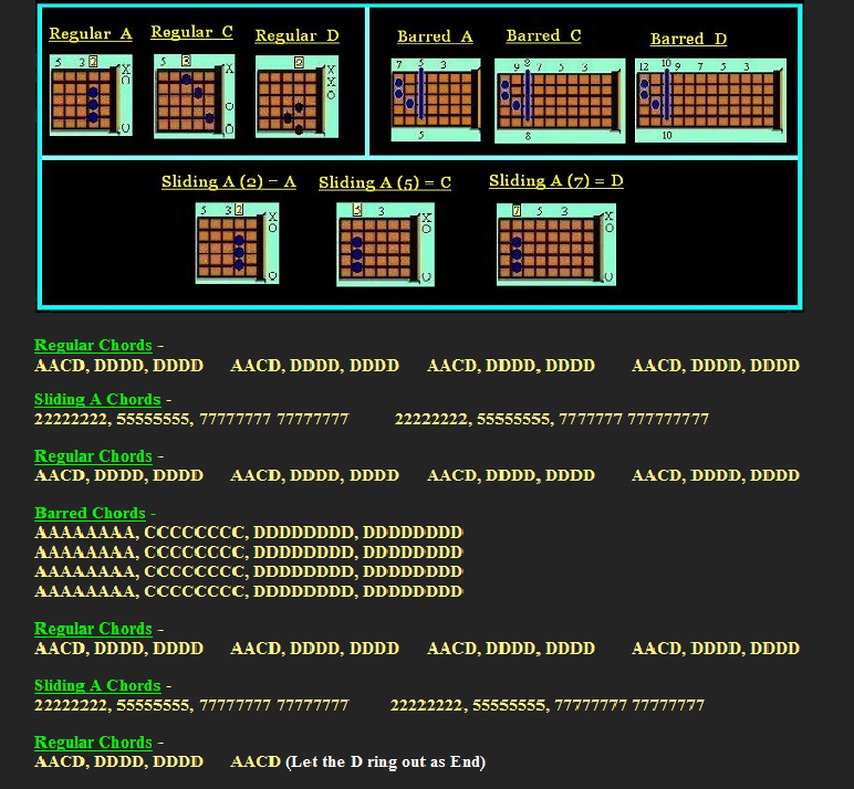
--- The Regular A and Sliding A (2) are the same!
To make this Practice Rhythm understandable
We will have the A, C & D listed as either Regular (meaning the way you first learned the Guitar Chord), Barred and Sliding A (The Sliding A, same Formation of the 'A' Major, but, slid to the different Frets). Keep in Mind - whichever way you play these Chords, your still just playing the A, C & D!
---Youtube Video - Lesson 9 - Practice Rhythm - 1st Part Explained - Part 1 of 3---
---Youtube Video - Lesson 9 - Practice Rhythm - Slower Tempo - Part 2 of 3---
---Youtube Video - Lesson 9 - Practice Rhythm - Rock Tempo - Part 3 of 3---
---In this quick Guitar Rhythm, each section is equal to an 8 count. So, (2** 22222) actually has 8 spaces or 8 Strums. The (*) means to let the Chord ring out. Since there are 2 of them, in each area it is used, you want to let the 1st Strum ring out for 2 seconds.
Lesson 10 - Practice Rhythm
In this Practice Rhythm, we are going to work on just 3 Guitar Chords (A, C & D). But, they will be played in each of the ways that you have learned in these Lessons.
We will include 'Sliding the A Major' that you just learned. This will get you more familar with changing between the Regular, Power & Sliding Guitar Chords.
--- The Regular A and Sliding A (2) are the same!
To make this Practice Rhythm understandable
We will have the A, C & D listed as either Regular (meaning the way you first learned the Guitar Chord), Barred and Sliding A (The Sliding A, same Formation of the 'A' Major, but, slid to the different Frets). Keep in Mind - whichever way you play these Chords, your still just playing the A, C & D!
---Youtube Video - Lesson 9 - Practice Rhythm - 1st Part Explained - Part 1 of 3---
---Youtube Video - Lesson 9 - Practice Rhythm - Slower Tempo - Part 2 of 3---
---Youtube Video - Lesson 9 - Practice Rhythm - Rock Tempo - Part 3 of 3---
Using 'Sliding Chords' is very Non-Traditional. Many Guitar Players have Never heard of them or even thought about using them. I have found that they allow an 'Easy Way' to add a little variation from the Original Sound of a Song.
Have 'Fun' with these and Keep Practicing!
Go Back Home
Have 'Fun' with these and Keep Practicing!
Go Back Home
